Creating Mini Scrapbook Albums Using Persnickety Box Photos
This post may contain affiliate links. This means I may earn a small commission at no extra cost to you if you make a purchase through my links.
If you’ve ever wanted to create a small, meaningful scrapbook without the overwhelm, a mini album made with Persnickety Box photos is the perfect beginner-friendly project. Mini albums come together quickly, use minimal supplies, and make heartfelt gifts for friends and family.
Learn how to create a 4″ x 6″ mini scrapbook album using your monthly Persnickety Box prints to document a birthday, weekend getaway, or any special memory.
Mini Scrapbook Albums made Easy
Do you ever think, ” I would love to create a scrapbook, but I just don’t have time”? You’re not alone. Many peoples’ photos never leave their phones because creating a scrapbook feels too overwhelming. The good news is you don’t need to make scrapbooks complicated or spend months finishing them. Thanks to the Persnickety Box app, creating a mini scrapbook album has never been easier!

What is Persnickety Box?
Persnickety Box is a photo-printing app available for both iOS and Android users. It offers a simple way to get your favorite photos off of your phone and into your hands. Each month, you choose 30 digital photos inside the app, and Persnickety Box delivers thirty 4″ x 4″ prints in a keepsake box straight to your door.
Archival-Quality Photos
Persnickety Box prints are developed on Fuji photo paper using silver halide printing technology. Unlike typical drug store prints, these photos are smudge-proof, water-resistant and kid-friendly. The beautiful matte finish is durable enough to be passed around, handled by little hands, and enjoyed for years to come without fading.
How to use the Persnickety Box App
Getting started is simple:
- Download the app from Apple’s App Store or Google Play.
- Choose a subscription – monthly or yearly.
- Use coupon code PH50 for 50% off your first Persnickety Box.
- Swipe your favorite 30 photos into your virtual photo box.
- Review and crop the images if needed.
- Close your photo box and let Persnickety Box handle the rest..
- Your box ships directly to you with thirty matte 4″x 4″ prints.
Why I Love Using Persnickety Box for Mini Albums
For small, themed scrapbook projects, the Persnickety Box format is a huge time-saver. With one photo size and a curated set of 30 prints, everything falls into place easily. Here’s what makes it work so well:
- No uploading of digital photos is required. Photos are chosen in the app.
- No choosing between multiple print sizes. All photos are 4″ x 4″.
- No complicated page layouts. Photos fit beautifully on 4″ x 6″ pages.
- Thirty photos are enough. They tell a complete story without feeling overwhelming.
With the photos ready to go, you can focus on the creative part rather than the prep work.
How to Create a Mini Scrapbook Album
Before you begin assembling your album, you’ll want to make a few decisions that will help your project feel cohesive and polished.
1. Choose a Theme
Your theme sets the tone for your mini album. You can document a recurring event or focus on a single moment in time.
Recurring Event Themes
Annual celebrations make wonderful themed albums because they show growth and change over the years. Examples include:
- Christmas Traditions
- Summer Vacations
- Places I’ve Called Home
- Birthdays
- Anniversaries
For example, the theme of my own album is Happy Birthday, Dear Daniel! It documents my youngest son’s birthdays from age 0 through 18. I selected one or two photos per year, added journaling about birthday memories, and captured how his interests and personality grew over time.

Stand-Alone Event Themes
If you prefer documenting a specific moment, choose a single event such as:
- A Weekend Getaway
- A Milestone Birthday
- A Graduation
- A Holiday Weekend
- The Birth of a Grandchild
Just be sure the event can be told with roughly 30 photos. Bigger stories, like a dream vacation or family history project, usually require more space.
2. Select a Color Palette
A limited color palette helps your album feel unified. For mini albums, I recommend choosing no more than four colors and including a neutral as one of your four.
If choosing colors feels overwhelming, pull hues directly from your photos. Look for a dominant color that appears throughout your images. Then use tools like Coolors Palette Generator or Canva’s Color Wheel to build the rest of your palette. Both tools are free and very beginner-friendly.
For my album, navy blue appeared frequently in my photos, so I used it as the starting point for my palette below and built around it using Coolors Palette Generator.

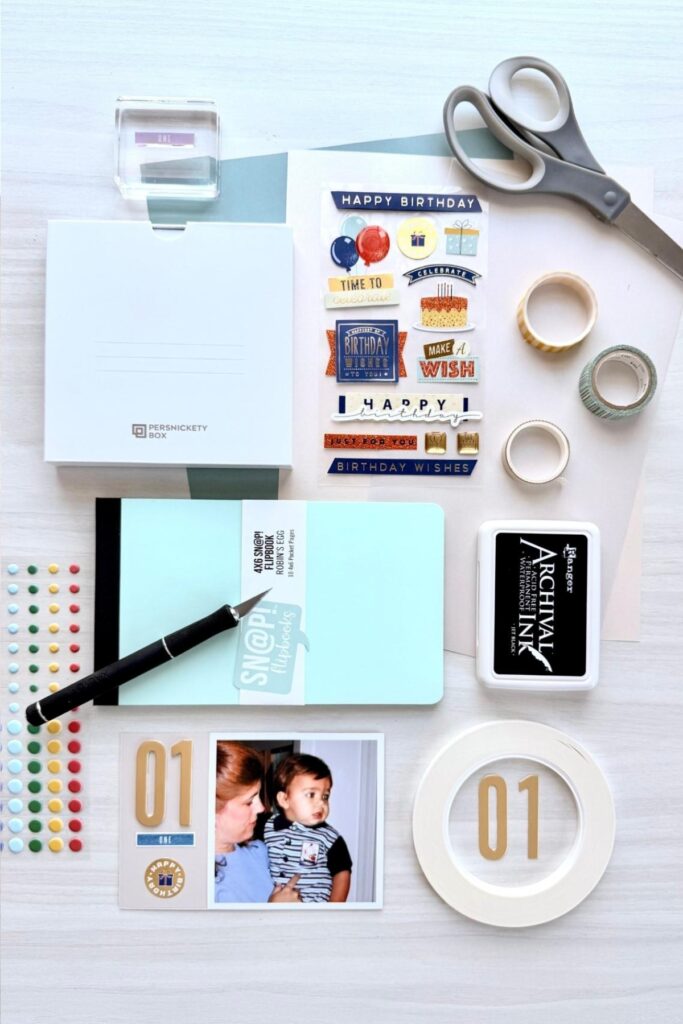
3. Create a Small Scrapbook Kit
This part is where the fun begins! Since each page in your album is small, try to limit your supplies and choose embellishments scaled appropriately for 4″ x 6″ layouts.
Here’s an example of what my scrapbook kit included:
- Neutral cardstock in Bone (#E3DAC9)
- Gold metallic die-cut numbers
- Number words stamp set
- Ink pad in Space Cadet (#222E50)
- Birthday sticker set in coordinating colors: Space Cadet (#222E50), Coral (#ED865A) and Honeydew (#E4F1E8)
- Stars and Dots sticker sets in coordinating colors
These items don’t need to be exact color matches but should be close enough to complement one another.
Affiliate Links
As an Amazon Associate, I earn from qualifying purchases at no extra cost to you.
Materials Needed
- 4″ x 6″ Pocket Page Album, Sn@p Studio Flipbook shown.
- Sn@p Pocket Pages Refill, 4″x 6″
- 65 lb acid-free, lignin-free cardstock
- Persnickety Box 4″x 4″ Photos, Use coupon code PH50 for 50% off first box.
- Double-Sided Tape, 1/4″ width, permanent, acid-free, tear-by-hand.
- 4″ x4″ Adhesive Label Pockets
Optional Materials
- Sn@p Pocket Pages Refill, 4″x 6″
If using the Sn@pStudio Flipbook, refill pages are required. - Alphabet and Number Stamps
I used the PegZ Bundle Planner Stamps in 3/16″ to create the title page. This set of rubber stamps has 108 individual stamps that lock together horizontally or vertically to create perfectly aligned words or numbers. - Stamp Pad, acid-free and permanent
Ranger’s Archival Ink works wells with the PEGZ Bundle Planner Stamps. - Large Sticker for album cover
2″W x 2.75″H Birthday Candles Sticker shown. - Stickers, Dies and Stamps for decorating pages
I used a number die set along with the Sizzix Big Shot Die-Cutting and Embossing Machine to create the large numerals on each page for my son’s age. Numbers measure 3/4″W x 2″H.

- Select 4″x 6″ Pocket Page Album.
The Sn@p Studio Flipbook is a great option. It comes with ten pocket pages and expands easily. - Insert additional pocket pages.
You will need one package of Flipbook Pocket Pages 4″ x 6″ Refills . Insert six additional pages for a total of 16 pocket pages. - Decorate album cover.
Add a sticker, title or simple embellishments to set the theme.
I used Canva to create the 2″W x 2.75″H Birthday Candles Sticker.
- Cut cardstock into 4″ x 6″ cards.
Use a paper trimmer or 4" x 6" Pocket Journal Die with the Sizzix Big Shot Die Cutting and Embossing Machine.
Using a paper trimmer is the fastest method; however, using a die ensures that every 4″ x 6″ card is exactly the same size. A die also ensures the height of the card will match the height of your 4″ x 4″ photo exactly.
You’ll need:
– 16 cards if mounting photos on both sides
– up to 32 cards if using different colors on front and back of each page - Create title page.
Decorate with stamps, stickers and embellishments.
I used The PEGZ Bundle Planner Stamps to create the words Dear Daniel and to add the date when I created the album. - Mount photos on 4″x6″ cards.
Arrange your photos in the order you want them to appear.
Using double-sided tape, mount each 4″ x 4″ photo flush with either the left or right edge of the page. - Decorate each page.
Add embellishments or journaling to help tell your story. - Journal your closing thoughts.
Share any reflections, favorite memories, or final notes on the last page.
Handwritten journaling adds a personal touch.
- Assemble album.
Slip your finished cards into the pocket pages and add an adhesive pocket to the inside cover of your album. Slip a 4″ x 4″ cardstock card into this pocket that notes where digital images of the printed photos are located. Using a pocket allows you to replace the card should information change in the future.
Be sure to include the date when the album is created. - Share your Mini Scrapbook!
Congratulations! You’ve taken the time to document and preserve meaningful memories in a mini scrapbook album. Now share this beautiful keepsake you’ve created with loved ones!


Affiliate Links
As an Amazon Associate, I earn from qualifying purchases at no extra cost to you.
Mini Scrapbook Album using Persnickety Box Photos
Equipment
- 4"x 6" Pocket Card Die (optional)
- X-acto Knife (optional)
Materials
- 1 Sn@p Studio Flipbook, 4"x 6" Manufacturer: Simple Stories
- 1 pkg Sn@p Pocket Pages Refill, 4"x 6" Manufacturer: Simple Stories
- 3 to 6 12"x 12" Sheets 65 lb Cardstock acid-free, lignin-free
- 30 4"x 4" Persnickety Box Photos (Use Coupon Code PH50 for 50% Off)
- 1 roll Double-Sided Tape, 1/4" wide Manufacturer: TSSArt
- 1 pkg 4" x 4" Adhesive Label Pockets Manufacturer: Ohuimrt
- 1 set PEGZ Bundle Planner Stamps Small 108 Piece American Typewriter, 3/16" (optional)
- 1 stamp pad Ranger Archival Ink, Jet Black (optional)
- 1 2"x 2.75" Sticker (optional)
- Stickers, Dies, Stamps and Washi Tape (optional)
Instructions
- Select a 4" x 6" Pocket Page Album.
- Insert additional pocket pages. Total of 16 pages required.
- Decorate album cover.
- Cut cardstock into 4"x 6" cards.
- Create title page.
- Mount photos on 4"x 6" cards.
- Decorate each page.
- Journal your closing thoughts on last page.
- Assemble album.
- Share your Mini Scrapbook!